
The Complete Beginner's Guide to Rowing Technique
Rowing looks simple. Pull the handle, slide back, repeat. But the rowing stroke is actually one of the most technically demanding movements in sport — a precise chain of muscle activations happening in a specific order, roughly 200-250 times in a 2K race.
Good technique is free speed. It lets you go faster with the same effort, reduces injury risk, and makes rowing feel fluid instead of awkward. Here's everything you need to know.
The Four Phases of the Stroke
Every rowing stroke has four phases. Understanding them is the foundation of everything else.
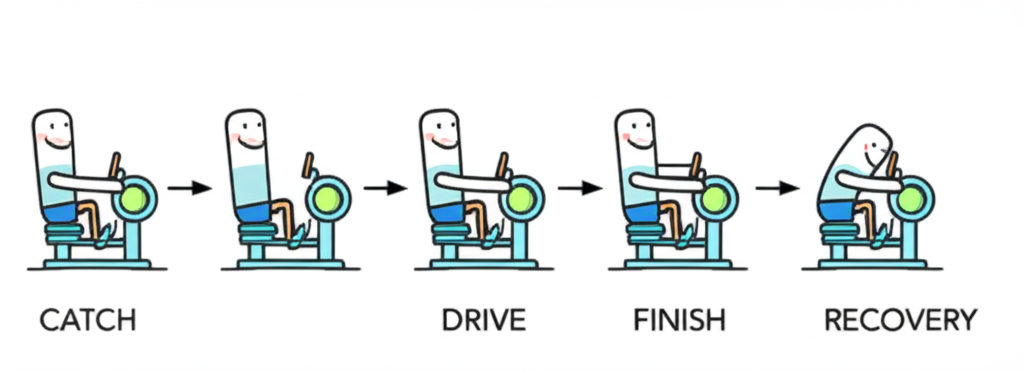
1. The Catch
This is the starting position — the moment the blade enters the water (or the moment you begin pulling on the erg). Your body should be:
- Shins vertical (or close to it). Going past vertical puts your legs in a weak position.
- Arms straight and extended, reaching forward from the shoulders. Don't lunge.
- Body angled forward from the hips, about 1 o'clock position. The forward lean happens at the hips, not the lower back.
- Core engaged, lats loaded, ready to push.
Think of the catch as loading a spring. You're compressed, coiled, and ready to explode.
2. The Drive
The drive is the power phase — you push the boat (or erg flywheel) and accelerate it. The sequence is critical:
Legs first. Push the footplate away. For the first fraction of the drive, nothing else moves — your arms stay straight, your body stays forward. This is the most common mistake beginners make: they pull with arms and back before the legs finish. The legs are your strongest muscles. Use them first.
Body second. As the legs pass the halfway point, your torso swings open from the forward lean to a slight backward lean (~11 o'clock). This is the "body swing" or "back swing." It adds roughly 30% of the stroke's power.
Arms last. As the body finishes swinging, the arms pull the handle to the lower ribs (on the erg) or draw the oar through to the body (on water). The arm draw is only about 10% of the stroke's power, but it finishes the stroke cleanly.
The drive should feel like a smooth acceleration, not three separate movements. With practice, legs-body-arms blends into one connected push. Power distribution: 60% legs, 30% body swing, 10% arms.
3. The Finish (or Release)
At the finish, you've completed the drive. Your body position:
- Legs flat on the footplate, fully extended.
- Body leaned back slightly, maybe 1-2 o'clock. Not a big lean — just past vertical.
- Handle at your lower ribs, wrists flat, elbows drawn past the body.
- Shoulders low and relaxed, not hunched up by your ears.
On the water, this is where you tap the blade out and begin the recovery. On the erg, it's the moment of peak chain tension before you reverse direction.
4. The Recovery
The recovery is the mirror image of the drive — arms, body, legs, the exact reverse sequence.
- Arms extend first. Push the handle away from the body smoothly and quickly.
- Body rocks forward from the hips back to the 1 o'clock lean. This happens before the knees bend.
- Legs compress as you slide forward on the seat, bringing you back to the catch position.
The recovery is your rest. It should be slower than the drive. A good ratio is 1:2 — if the drive takes 1 second, the recovery takes 2 seconds. Rushing the recovery is one of the most common and costly mistakes in rowing.
The Five Most Common Mistakes
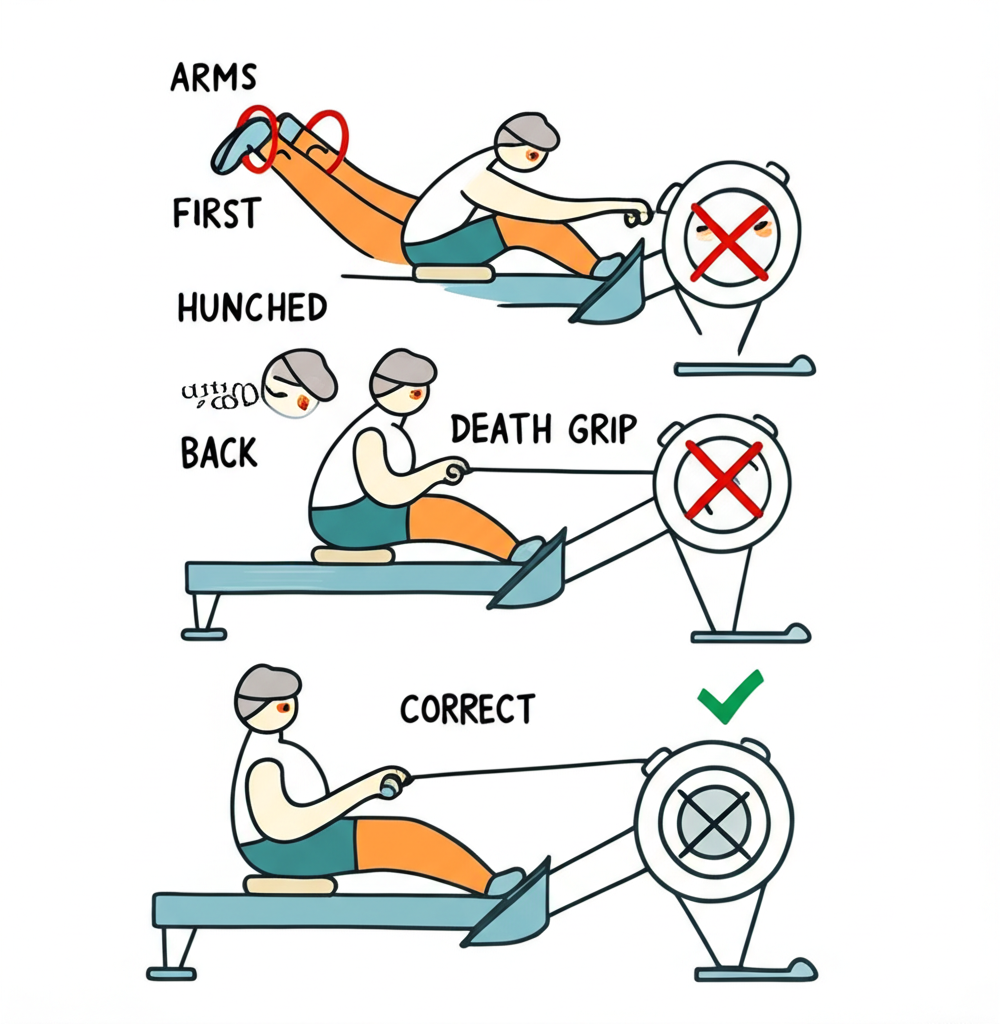
1. Breaking the Arms Early
The mistake: Bending the arms and pulling before the legs finish driving. This robs you of leg power and puts all the load on your comparatively weak arms and back.
The fix: Think "push" not "pull." At the catch, imagine pushing the footplate away from you. Keep your arms straight until your legs are nearly flat. A good drill: row with arms straight for 20 strokes, engaging only legs and body.
2. Rushing the Slide
The mistake: Shooting forward to the catch as fast as possible. This throws off the boat's balance (on water) and wastes energy (everywhere). It also prevents you from loading properly at the catch.
The fix: Count "1" on the drive and "1-2" on the recovery. The slide forward should decelerate as you approach the catch — imagine you're sneaking up on it. On water, rushing the slide also checks the boat (slows it down between strokes).
3. Hunching the Back
The mistake: Rounding the lower back instead of hinging at the hips. This is both inefficient and a fast track to back pain.
The fix: Think "proud chest." Maintain a flat or slightly arched lower back throughout the stroke. The forward body angle comes from rotating at the hips, like a hinge, not from curling the spine. If you can't maintain a flat back at full compression, your hamstrings may be tight — work on flexibility.
4. Overcompressing at the Catch
The mistake: Sliding so far forward that your shins go past vertical and your knees crush into your chest. Past vertical, your legs lose mechanical advantage and your first push is weak.
The fix: Stop when your shins are vertical. If you can't tell, have someone watch from the side, or film yourself. You should feel loaded and powerful at the catch, not cramped.
5. Gripping Too Hard
The mistake: White-knuckling the handle or oar. A death grip fatigues your forearms fast and creates tension up the chain into your shoulders and neck.
The fix: Hook your fingers over the handle. Thumbs go underneath for security, but the grip is in the fingers, not the palm. Your wrists should be flat and relaxed. Think of hanging from the handle, not squeezing it.
Drills to Build Good Habits
These drills isolate parts of the stroke so you can practice the sequence without worrying about everything at once. Do them as a warm-up before every session.
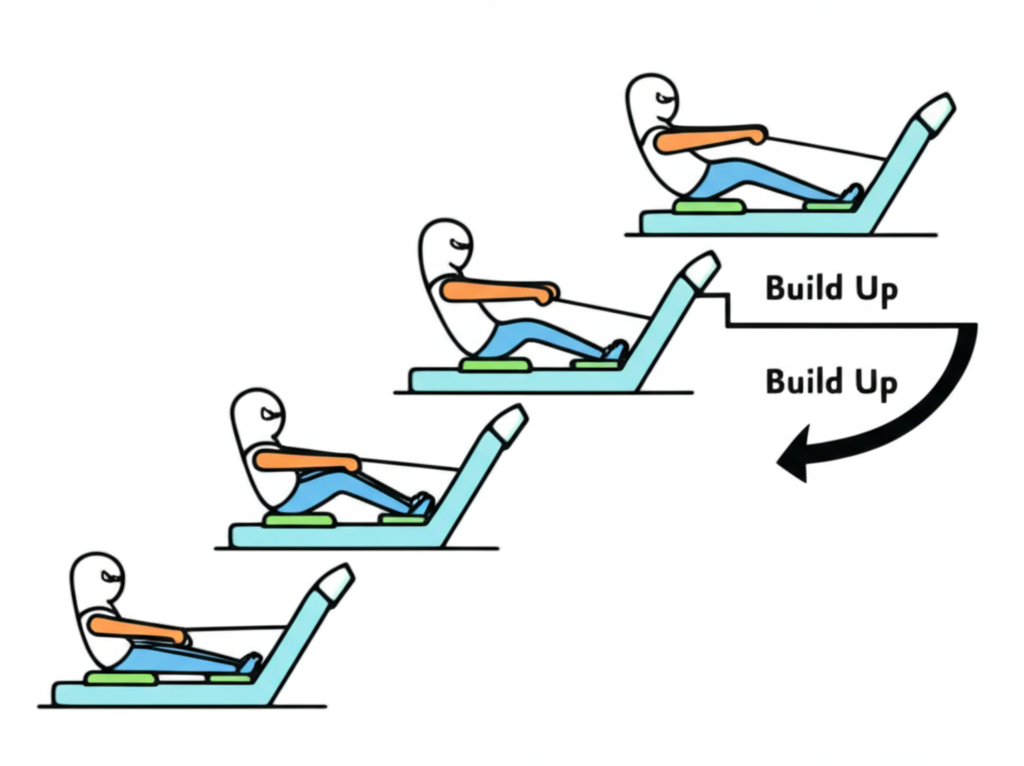
Arms Only
Row using only your arms. Legs stay flat, body stays still. This teaches a clean arm draw and helps you feel the handle path — straight and horizontal to the lower ribs.
20 strokes, light pressure.
Arms and Body
Add the body swing. Arms draw first, body swings from 1 o'clock lean to 1 o'clock layback. Legs stay flat.
20 strokes, light pressure.
Half Slide
Add the legs, but only come to the half-slide position — knees bent halfway. This is where you start to feel the legs-body-arms sequence. Focus on legs initiating the drive.
20 strokes, building pressure.
Full Slide
Put it all together. Full stroke, focusing on the sequence and a controlled recovery. Count the ratio: 1 on the drive, 2 on the recovery.
20 strokes at full pressure, then continue into your workout.
Pause Drills
Row normally but add a 2-second pause at different points in the stroke:
- Pause at arms away: Teaches quick arm extension and proper sequence start on recovery.
- Pause at body over: Ensures body rocks forward before the knees bend.
- Pause at half slide: Builds awareness of slide control and balance.
10 strokes per pause position.
Erg vs. On-Water: Key Differences
The stroke fundamentals are the same, but there are practical differences.
| Aspect | Erg | On Water |
|---|---|---|
| Balance | Not a factor | Critical — the boat moves under you |
| Blade work | No blades | Squaring, feathering, depth control |
| Handle height | Fixed path | Varies with rigging and conditions |
| Catch timing | Instant | Must coordinate with blade entry |
| Visual feedback | Monitor data | Boat run, puddle spacing, blade depth |
| Recovery | Just slide control | Slide control + balance + blade clearance |
If you're learning on an erg with plans to go on the water, everything you learn about stroke sequence and power application transfers. The additional skills — balance, blade work, steering — are layered on top.
Setting Up the Erg
Before your first stroke, get the basics right.
Foot Position
The strap should cross over the ball of your foot (the widest part, at the base of your toes). Too high and you'll struggle to reach the catch. Too low and you'll lose connection at the finish.
Damper Setting
Start at 3-5. The damper is not a difficulty dial — it controls how much air flows into the flywheel, changing the "heaviness" of the stroke. Lower settings (3-5) feel lighter and reward technique. Higher settings (8-10) feel heavy and exhaust muscles before your cardiovascular system gets a workout. Most Olympic rowers train at 3-5. See Concept2's guide to damper settings for the full explanation.
Monitor Basics
The key metric is your split — the time it would take you to row 500 meters at your current pace. A 2:00 split means you're averaging 500m every 2 minutes. Lower splits are faster. Other useful numbers: stroke rate (strokes per minute), distance, and time.
Your First Workouts
If you're brand new, focus on technique first and fitness second. Here's a simple progression:
Week 1-2:
- 3 sessions per week, 15-20 minutes each
- Start every session with the drill progression (arms only → arms + body → half slide → full slide)
- Row at low intensity (you should be able to hold a conversation)
- Rate 18-20 strokes per minute
Week 3-4:
- Increase to 25-30 minutes per session
- Add a fourth session if you feel good
- Continue starting with drills
- Begin tracking your split on the monitor
Month 2+:
- Build to 30-45 minute sessions
- Start introducing some structured workouts (intervals, tempo pieces)
- Read our guide on how to improve your erg time for training plans
The most important thing: don't go too hard too soon. Rowing uses muscles you didn't know you had. Build gradually, focus on the movement pattern, and the fitness will follow.
More Resources
- How to improve your erg time — structured training plans for getting faster
- Erg benchmarks by age and level — where your times stack up
- Rowing boat types explained — understand the boats if you're heading on the water
- Training tools and apps — apps and coaching tools to support your learning
- Rowing equipment — ergometers, accessories, and gear